Showing posts with label cabin. Show all posts

Saturday, August 22, 2026

Refresh the NexGrill

 The grill at the cabin was falling apart, the left burner wasn't attached anymore and the coverers were rusting though, also the grills were rusting and flaking off. I was able to pick up a new set of most of it on Amazon for ~$70, which seemed like a good deal, since the outside wasn't rusting too bad, and a new one cost $400. That and it sucks to throw those things out every 10 years. So we will see how long it last now, next time will probably have to replace the whole thing.


Thursday, June 18, 2026

Replace the cabin Furnace

 In January we went to the cabin to do some cross country skiing and ice fishing. The day that we left we noticed that at some point the old furnace how had a bit of a blow back, and fried the wiring. 


So that was scary! I had been wanted to replace it for awhile, since it was 60% efficient. So I had been watching facebook, and even went to talk to the folks at Appliance Depot, I thought I could get a new 80% furnace for $7-800, but the quote came back at $1300 (plus the conversion kit), so I went back to facebook.

I was able to find a 2012 Rheem that should meet the need for $200. I found a LP conversion kit on eBay for $35 (vs $100 normally).

Last weekend we go the old one out and the new one into position.


I talked to a friend at work and AI, and figured out that I need a 4" chimney liner for the vent, so I ordered that and will work on that the next time we are up. I have the manometer from the garage furnace project, so I should be able to get the right gas pressure at the value. The electric was pretty easy, the existing conduit even worked.

It is a lot smaller, so we were able to move the wood burner over and put the new furnace in between 2 support posts in the basement, so we get some room back as well.


Monday, October 6, 2025

Fix up the old 4 wheeler

We have had a 4 wheeler at the cabin since I started coming up, but we only really used it for pulling out the dock.  Maddie went to a friends cabin and rode around on her 4 wheelers and had fun, so we thought it would be fun to get a little more use out of ours.

But it isn't much fun to go by yourself, so we wanted to fix the older one that Joanne had in her garage at home.  It was in pretty bad shape, but the Nick cleaned it up, then tried to clean up the carb.  But it would only run with starter fluid, so we ordered a new carb and he put it in and it has been running pretty well since.


Sunday, September 14, 2025

Redo the Pontoon

The carpet and the sliding on the pontoon was looking pretty tired, so we decided to freshen it up.  We had to take off the rails and edge trim, put on the new carpet then put the rails back on.  You can see the old white and red fence (we called her the speckled queen).

We put new vinyl on the pedestal as well.  I have been working on the new blue fence over the summer, the girls aren't thrilled with the results, but I think it looks pretty good.  I was trying to use the old holes in the rails, so there are a couple wavy spots.

I was able to complete the simple fences over the summer, but the fence that curves up I need something to cut it with easier.  


Saturday, May 10, 2025

First trip up North

 We had some hot weather so came up to open up the cabin.  We worked on taking the rails off the pontoon and I worked on fixing the motor.  I am going to need to retap the threads on the drain plug.  Brainerd marine didn't seem too interested in helping with that project, so I will try DIY... 

I did get the thread chaser and was able to clean it out and get the plug back in.  We also, got the new carpet on the pontoon and started replacing the fence.


Wednesday, June 5, 2024

Bathroom costs

I have been collecting receipts for the last year, this is what I have so far...
  • $350 - 60"x42" White curb shower base
  • $500 - Wall Tile, grout
  • $40 - lights
  • $20 - bargin door
  • $120 - pocket door frame
  • $100 - faucet
  • $100 - drain PVC, ball valve, pex adapter, etc
  • $130 - cement board
  • $110 - waterproofing stuff
  • $100 - self-leveling concrete
  • $30 - mortar
  • $35 - drywall
= $1635

I am sure there is more I am missing but it is probably under $2000.  We still have the floor, toilet, and vanity to find.  So all in will probably be close to $5000 I would guess.


Sunday, October 29, 2023

Bathroom pt 10

We came up to do some raking and to turn off the water.  I was able to grout the shower so the next time we come up we can seal and put in a door and should be able to shower again!


Monday, August 28, 2023

Bathroom pt 9

We came up the previous week as well, but I didn't grab a picture.  Most of the tile is in now, I had pieces fall out on me, so I had to mix up a little thinset and re-apply.  Fan is in now too, that needed some work to get the hole right.


Sunday, August 13, 2023

Bathroom pt 8

 More tiling this weekend, trying to figure out how to do the recess and cutting around the faucet.  Also, ran the water to the faucet so I could test that out.  Used the pex clamp.


Sunday, August 6, 2023

Bathroom pt 7

I was able to get the shower waterproofed and start tiling this weekend.  We have that nice accent tile, but it ended up being closer to the wall then the big tile, so I am not sure how that is going to turn out.  But I went with it.
Loving the tile spacers and levelers!


Sunday, July 30, 2023

Bathroom pt 6

 Progress continues, slow but steady...  Hard to get a lot done 2 days at a time, when your family enjoys your company as well 😁

I was able to get some drywall and durock up.  I used my left over thinset from filling in hole and tried to tuck point the cinderblock wall a bit as well.

Looks like the lights were installed as well.  I forgot to mention a spend a good chunk of time vanishing the ceiling as well, before the show pan went in.  I had a good respirator for that, and I am glad that I did, because it made the entire cabin stink for a day or 2 after!


Sunday, July 23, 2023

Bathroom pt 5

 Another weekend some more progress.  I was able to get the hole drilled for the vent, install the sliding door, and get the shower pan installed (with the issues I mentioned in the last post).


Sunday, July 16, 2023

Bathroom pt 4

 I was able to finish up most of the ceiling, and I put down self-leveling concrete in the shower pan.  However, self-leveling is a bit of a misnomer.  It looks really smooth and level, but it isn't 100% level there is probably at leave a 1/4 to 1/2 difference in some places...

I put some glue on the fins of the shower pan, but it didn't fix it entirely and the pan will squeak a bit here and there.  I may try to spray some foam under it, but it will probably not work well, since there are fins in the way...  If I could start over I would put down a bed of mortar, or make sure it was really level.


Saturday, July 8, 2023

Bathroom pt 3

 As I was waiting for the concrete to dry, I started working on the ceiling.  Greg has a bunch of cedar he had planned to use for a sauna, but it worked really well as the ceiling in the bathroom as well.


I would end up regretting just putting the wood in there like that, as they were not easy to remove.  However, they did get the job done.

Friday, July 7, 2023

Bathroom pt 2

 I was eventually able to get the old plumbing out, I tried heat, that didn't work and probably wasn't too healthy...  The I used a reciprocating saw and cut off the trap, so I could use some drill bits and drill out the lead/oakum.  Eventually I was able to wiggle it out.


That is a lot of years of built up hair in the drain, amazing that it worked at all!

There is a rubber gasket that goes into the iron pipe, then this goes in and we start the looping.

I thought about putting the trap coming right out of the iron drain, but the guy at Ace said it would be best to have it right under the drain and it worked well like that.  Overall very happy with how it all turned out.  It seems to be draining well, and hopefully will be for a long time!

Wednesday, July 5, 2023

To redo a basement bathroom at the Cabin

 I am writing this on October 30th, because I wanted to finish the bathroom before I posted about it.  It is somewhat done at this point.  We did the demo on this day.  We had been up since Friday, but had played a lot!  Leading up to this, I had taken out the toilet, sink, drywall, and rewired for the new location of the switches.  But we had held off on the shower till now, since it is the only one!


That is the before.  We accomplished quite a bit that first day!


Then I saw this!


Sunday, May 29, 2022

Yuck! Faucet has been leaking for awhile!

After working through the aforementioned issues in the previous posts we happened upon some water in the middle of the basement.  Jen then noticed that it was coming from the floor above at the kitchen sink.

Since there was a plethora for "stuff" in the cabinet we hadn't noticed a problem until this water in the basement, but when we removed everything we could see that we had quite the mess under the sink.  It appears that the faucet has been leaking for quite awhile, the bottom of the shelf was mushy and black.


So it was time to replace the faucet.  Unfortunatly, the nuts had rusted and were difficult to remove.  Basically I ended up breaking them.  It was not a fun task under the sink with a mucky floor.  Eventually got it off though.


Not sure what all this is, probably minerals from the water...  Not a good look in any case...

The old shut off values wouldn't turn anymore, so I cut them off and soldered on new one.  I have to make sure that the pipes are still properly positioned so that they drain in the winter.  These pipes will move up and down now.


Once the old faucet was off and the new turn off values installed the faucet installed easily and Nick did most of the work.  It is nice to be able to hand off projects to other people.  I am hoping that the new faucet will drain properly, so we might be getting a new one.  The guy at Menards said this is their busiest time of the year!


Saturday, May 28, 2022

New Life for the Water Heater

When we came up earlier this year we had to hot water, so we had to boil water on the stove to do dishes.  Not ideal!  I was thinking I was going to have to put in a new water heater, but I stopped by Appliance Depot and he recommended that I just check out the connections with a multimeter first.

Once I started doing a little reading I realized it might not be so bad.  The first thing I measured was the voltage at the heating element.  That is the bottom part with 2 wires going to it.  It measured 240V, so I knew the breaker was fine.

Then I shut off the breaker and did a continuity check, which resulted in no continuity.  I checked the bottom element as well and there was continuity there.  So I determined that the heating element needed to be replaced.


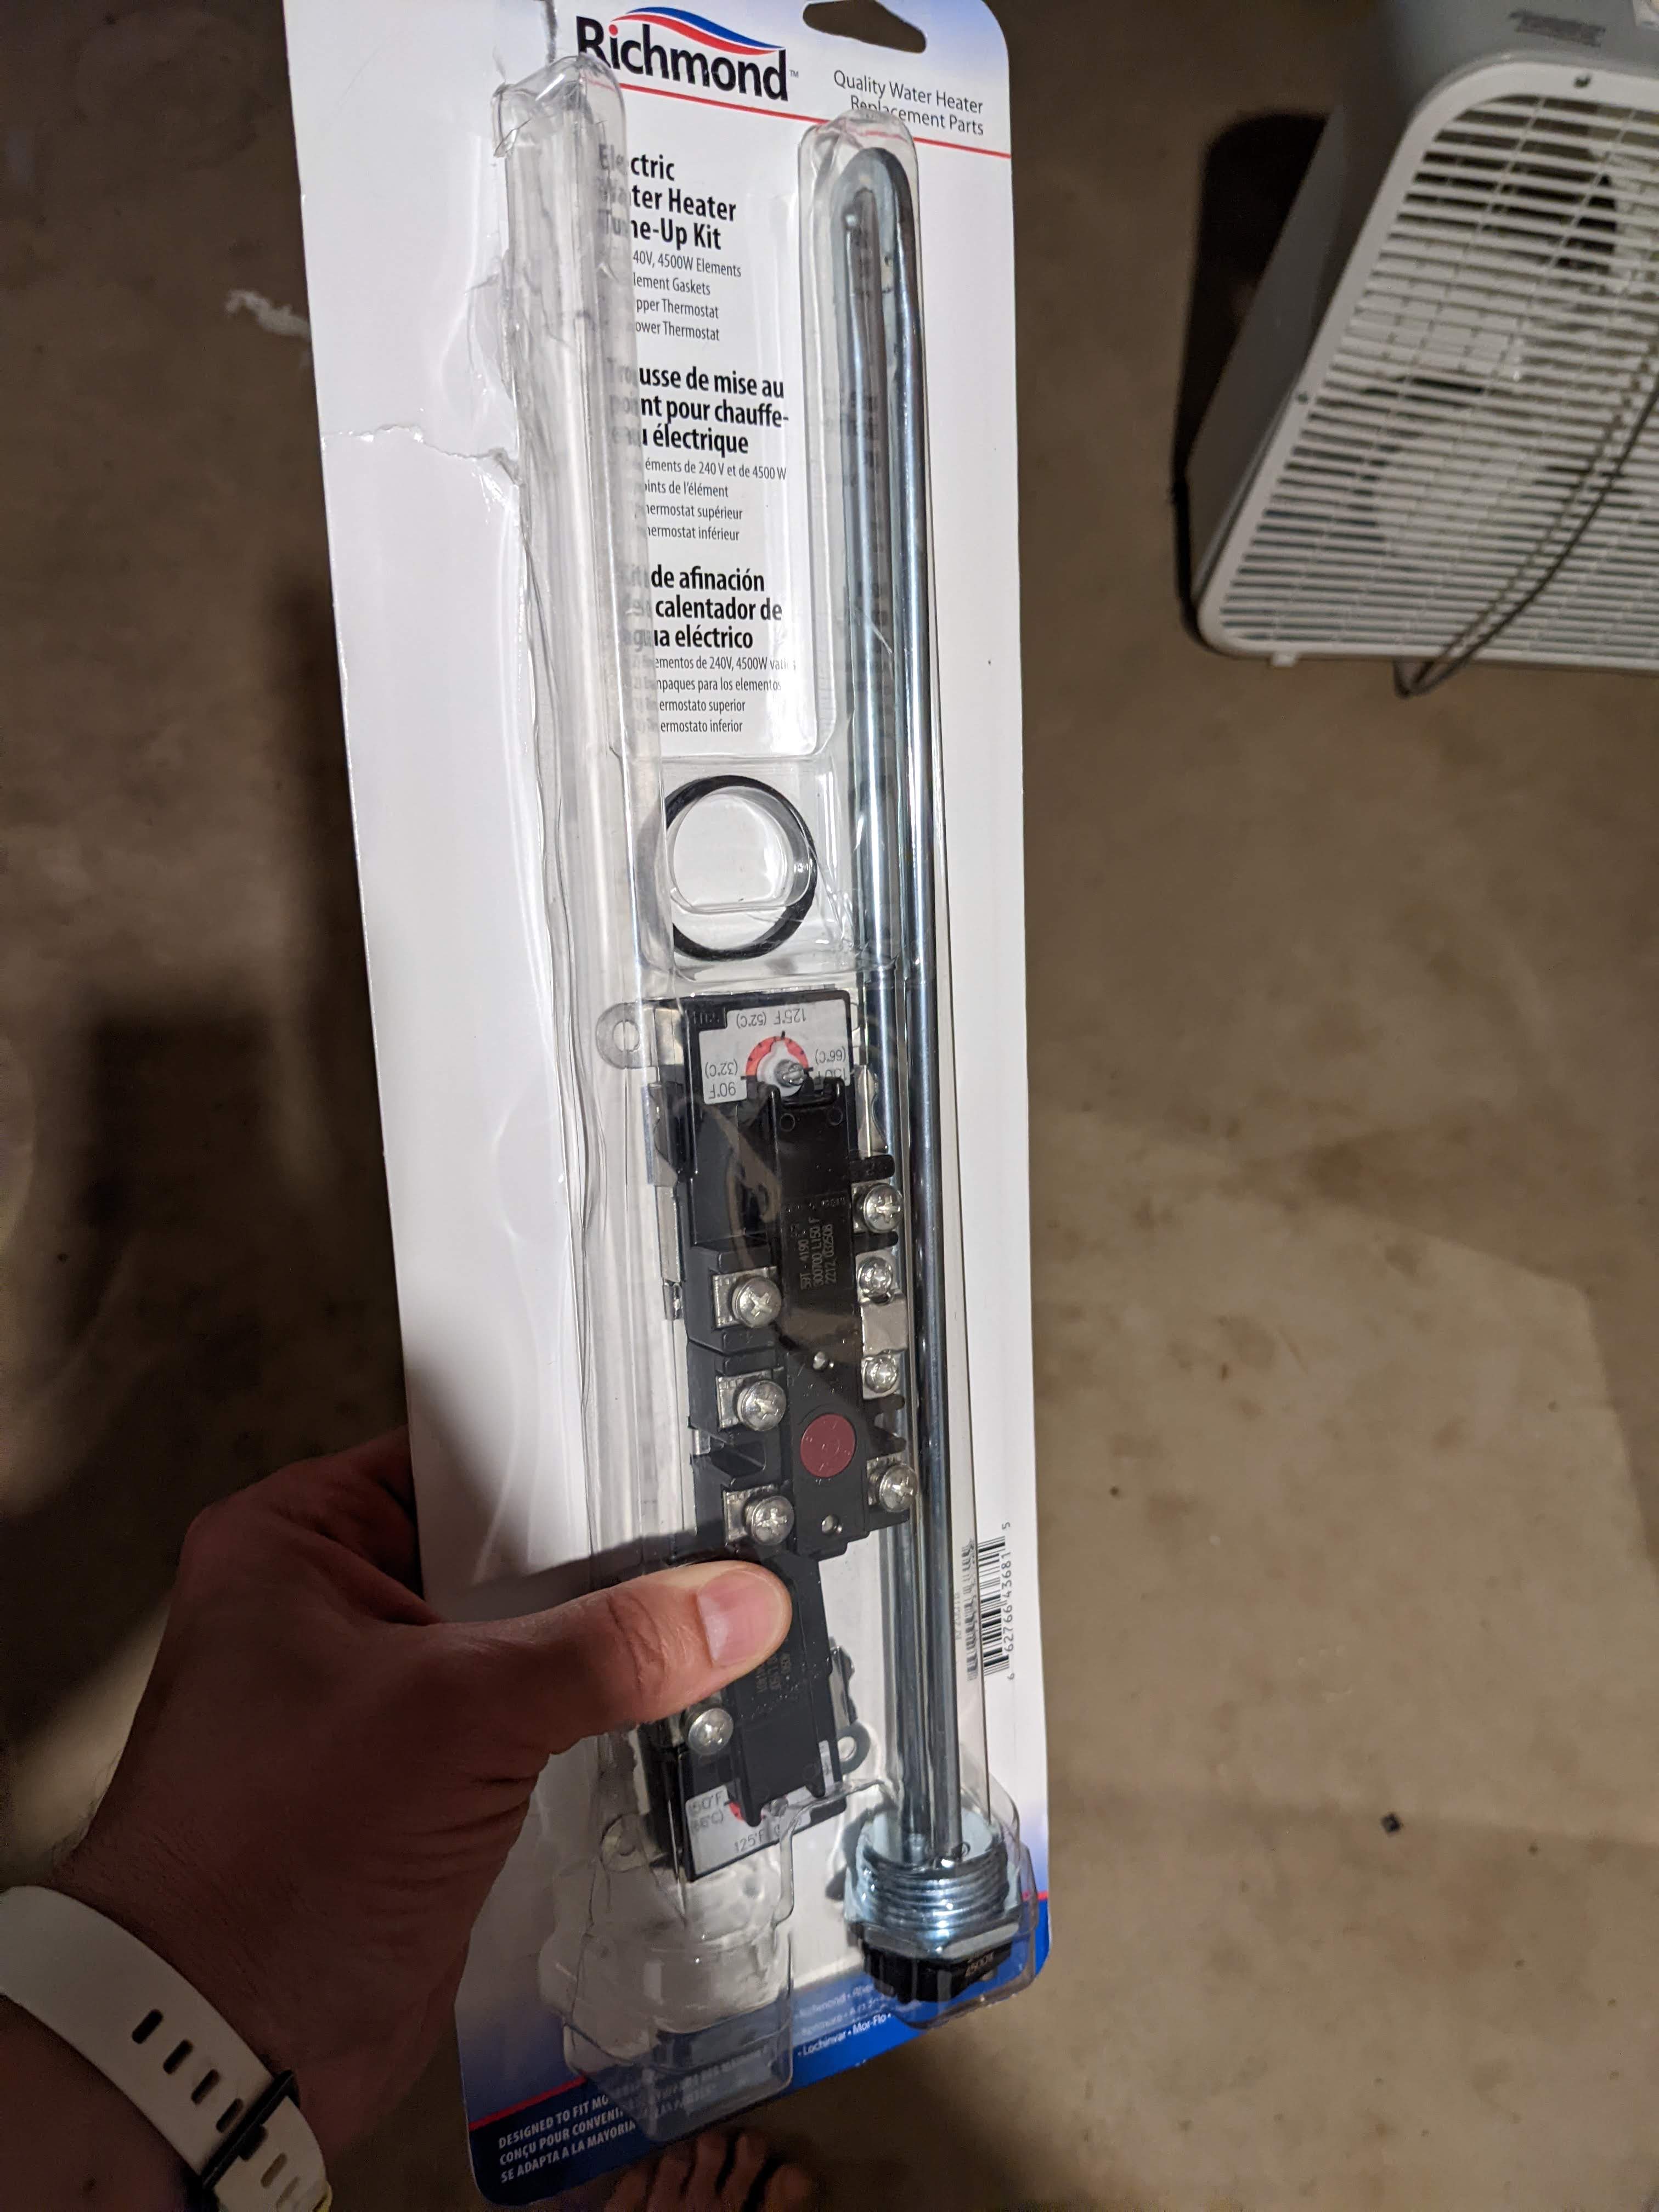
I could buy 1 heating element for $20 or a pack with 2 plus the thermostat for $25.  So I went with the later.


They normally have a 1.5 inch water heater heating element wrench that you can buy for $7, however they were out of them at the time.  So I went with $65 dollars worth of a socket and breaker bar.  I don't feel too bad about returning them after I used them, and I will pick up the $7 wrench when they are back in stock as it seems like something useful to have around with my spare heating element.
 

Here you can see the old heating element.  Not sure what happened to it, but it no longer has continuity.  Also interesting that it was a lot shorted then the new ones.  Same wattage though, which appears to be the important part.


Overall a simple fix and a big relief.  I wonder if I need to check the sacrificial rod in the water heater and if that could have caused the issue with the heating element.  I will have to read into that.

New Bunk Bed

We had ordered a bunkbed for the back bedroom at the cabin just about exactly a year ago and it finally came in.  I had hoped to use it in the winter when we don't open up the Eagle Nest.  But we didn't make it up this winter, so it wasn't a big lose.


Jen and Maddie worked on this project and did it almost entirely on their own.  I only helped with lifting the twin bed over the full bed.  They did a great job and it was comfortable to sleep on, and will provide for an extra bed in the future!


Toilet Trouble

We went up to the cabin for the second time this year so we had an idea of some of the issue we were looking forward to.  You can see the toilet fill mechanism cracked, so we had to manually control the shutoff value to fill the tank.


Fortunately, the fix was an $8 part from Menards.  It was a simple fix and Nick handled this one all by himself while I was working on other issues!