Monday, December 26, 2022

Washer Boot Replace


Our old washing boot was pretty gross and was ripped a bit on the side, so water would come out when Jen would do a cleaning cycle.  The hardest part is getting the steel ring back on the outer part after it is all back together.

This is the second time I have replaced the boot in 13 years, so we get about 7 years out of one.  It isn't easy to find one for this washer anymore, I ended up paying $80 for it.  It was $80 3.5 years ago when I did it last time.  Not sure why that one didn't last as long...

Then I cleaned out the filter at the bottom and it was GROSS!  It always is.  If you haven't cleaned yours in a while it is worth looking at!

Garage Heater part duex


I built a thermostat to control the heater.  I have a little server running on NAS that it uploads temp/humidity data to and will update the setpoint when it sends data (once a minute).  I don't have it running all the time, only when we are out there and need it.  It was a fun little project.

I will eventually get around to adding graphs, but for now it will cycle the heater on and off as needed to maintain setpoint.


Sunday, November 13, 2022

Garage Heater

 I installed a garage heater this weekend.  I have had it for about a year and finally got around to installing it.  I think it will be pretty nice to heat up the garage to work out there.  We aren't going to heat it all the time, that would be pretty wasteful, just when we are out there.

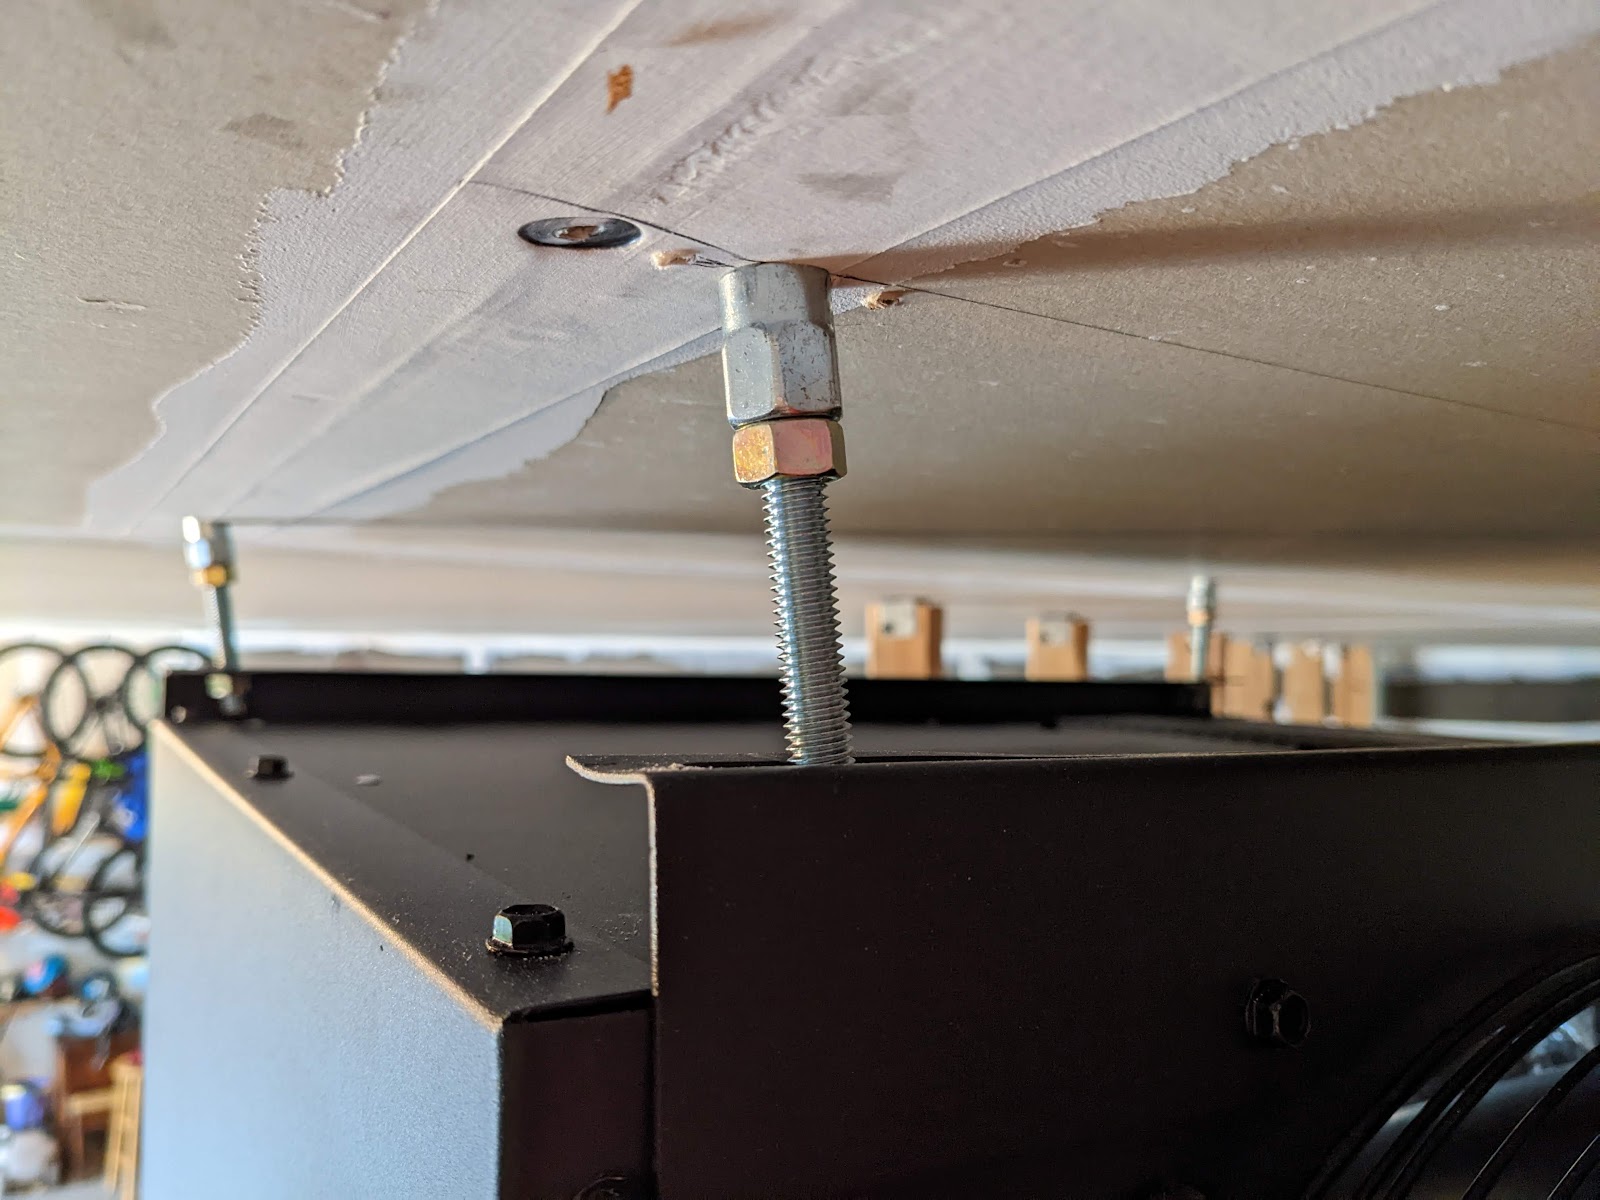
The first issue I ran into was that the heater is a little more narrow then the 24 inch rafters in the ceiling.  so I just screwed a 2x4 into it and screwed into that.


I used these thread hanging screws that worked OK, probably should have just used angle iron like everyone else does.  Trying to muscle the heater onto the posts was a challenge.  I wish I would have had a drywall lift.  You can see the rods were able to move around a bit which allowed it to work.  The fit was quite tight.


It feels very secure and doesn't move around at all, so I am pretty confident in the threaded rods.  Once it was up, I had to figure out where the exhaust would go.  I used a carpentry square to figure out where to make the hole in the wall.


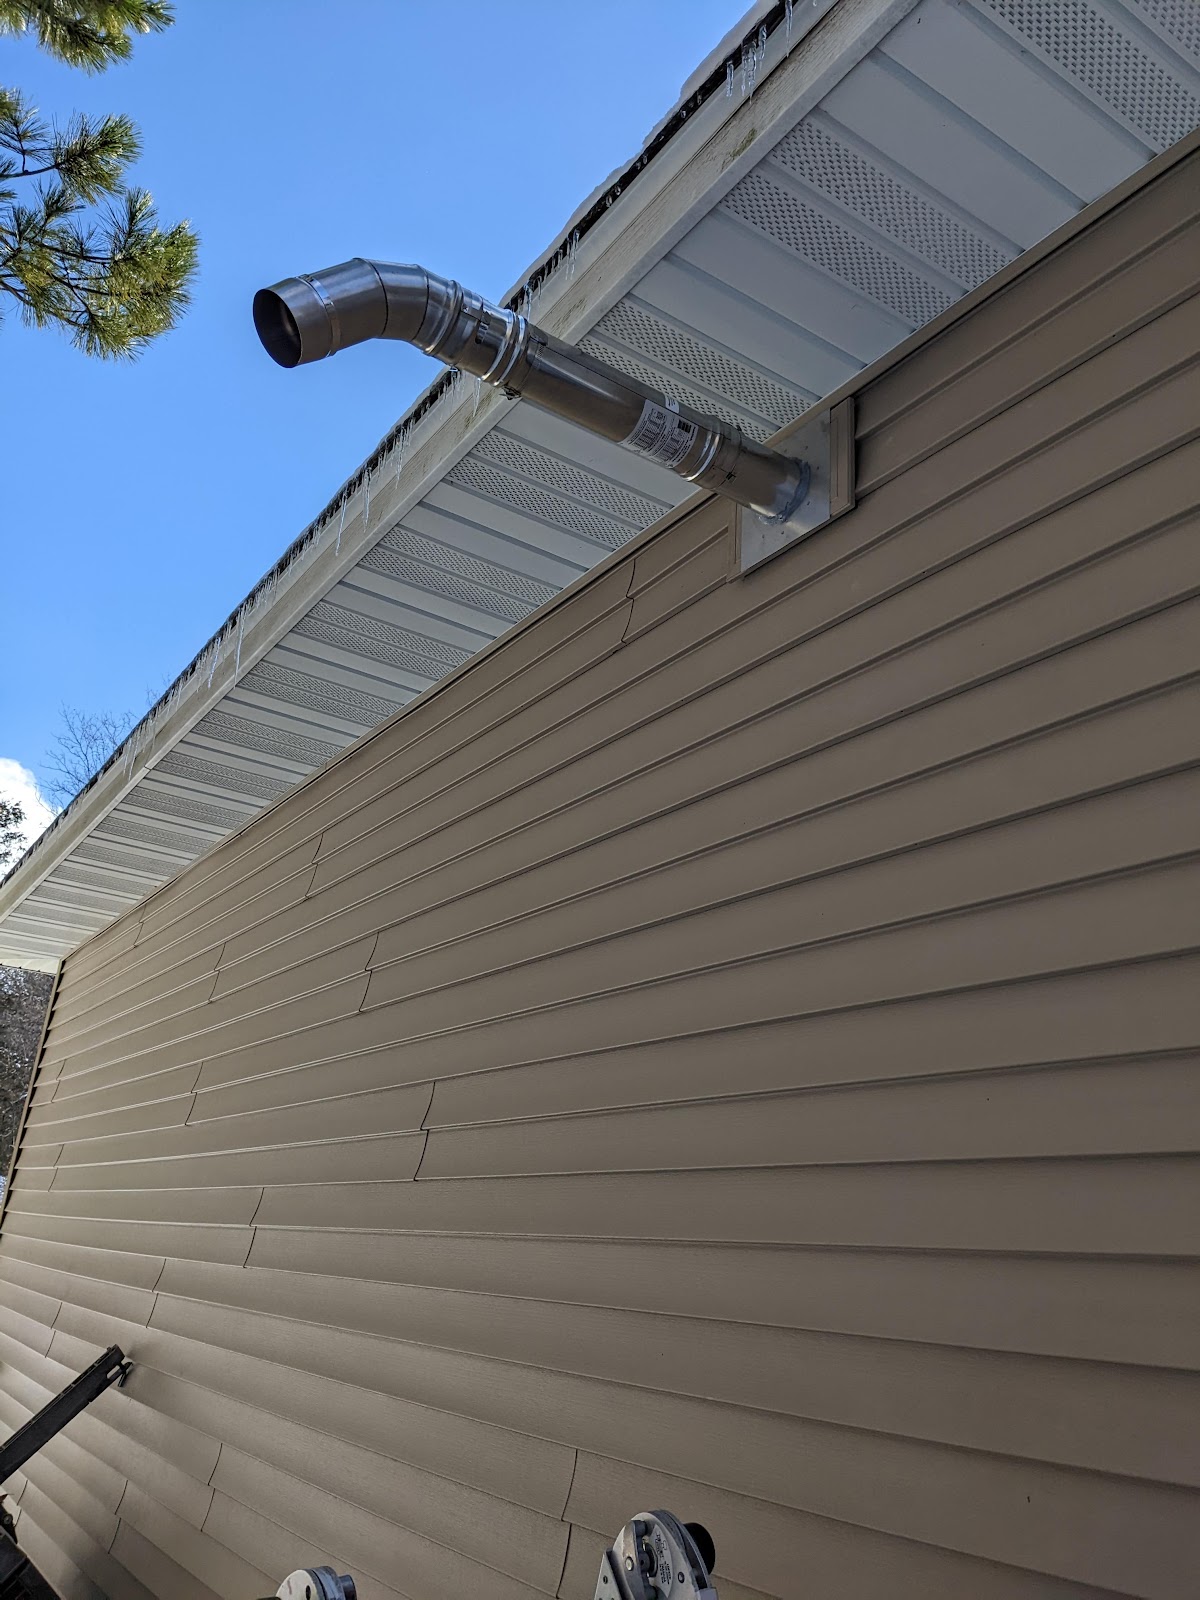
Always the scariest part, putting a hole in an exterior wall.  I used a rotozip tool, which made quick work of making the hole in the drywall.  I used an ocsillating tool on the vinyl outside, since I had a block with j-channel built in.  Getting the siding off so I could slide the j-channel in was a challenge in the cool weather.

I originally just had the exhaust blowing out pretty close to the soffit.  But thought better of it and added another 19 inches of length, I don't think it will hurt anything there.  It is supposed to be 4 feet out, but that would be really far out!  Since we aren't running it all the time, I am OK with where it is at.


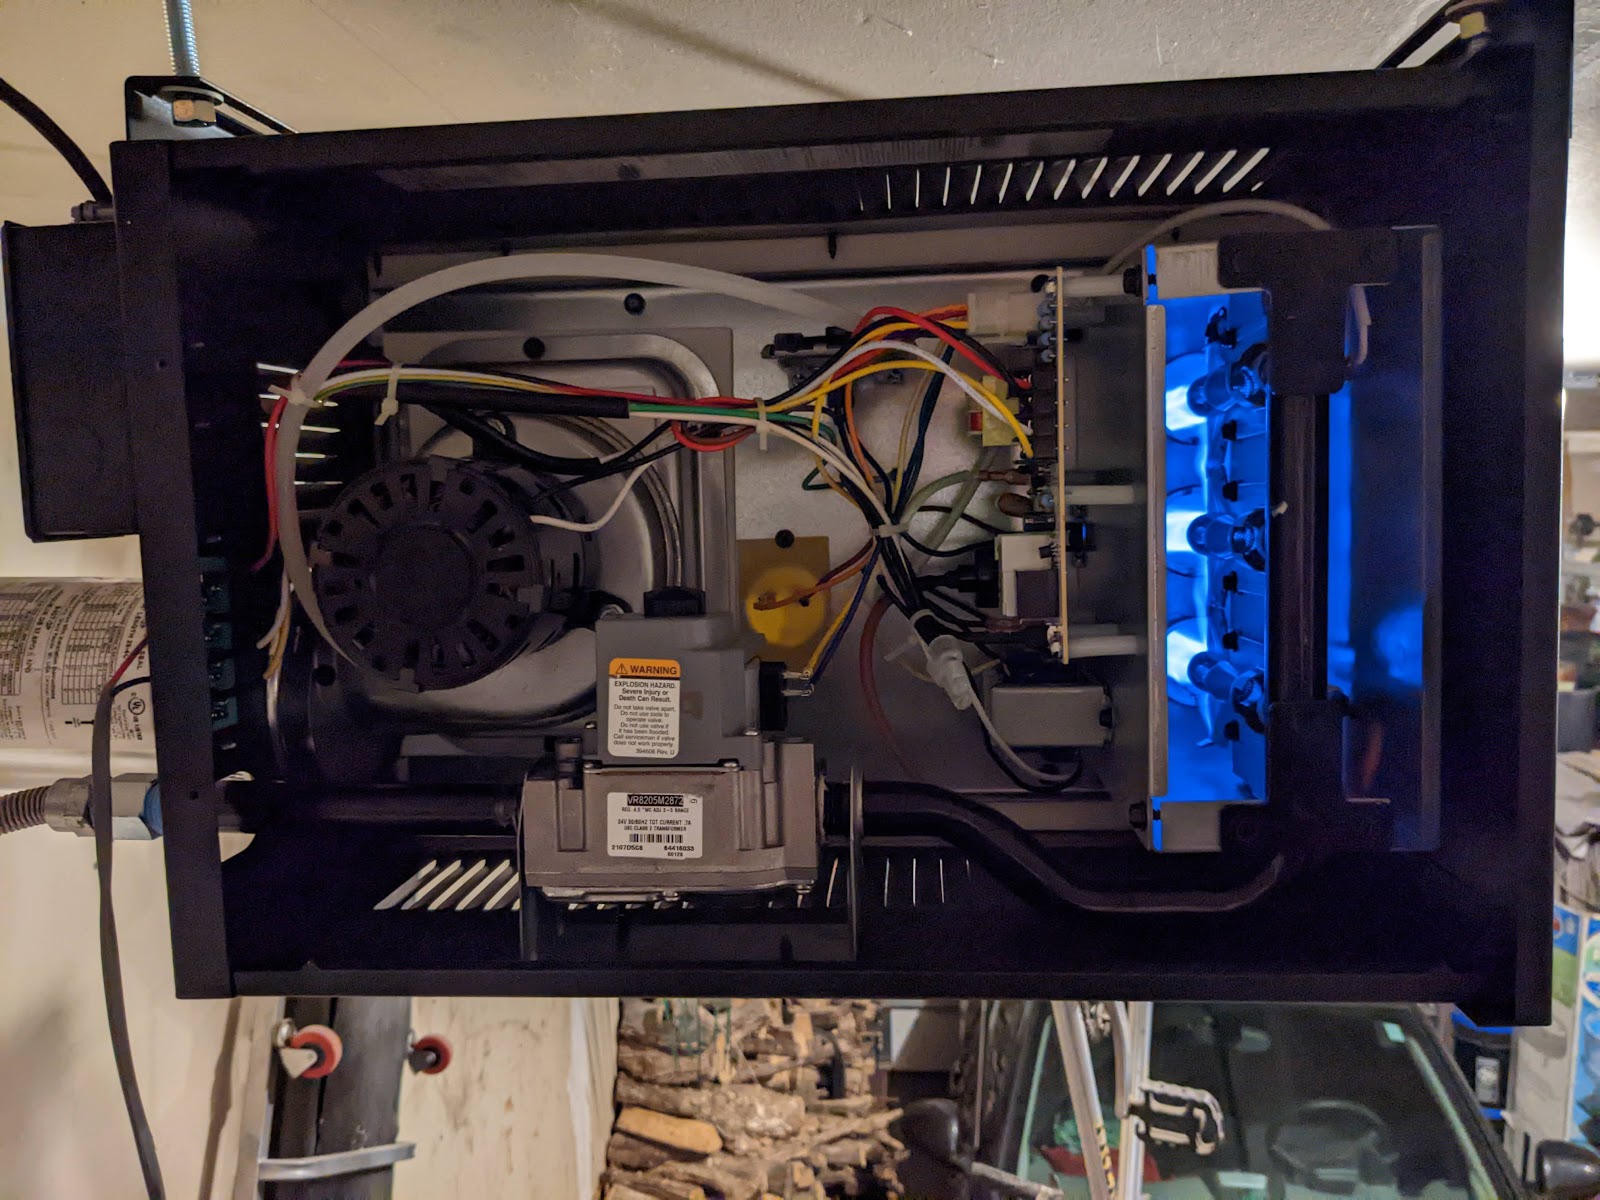
Here it is running.  I am working on making a thermostat, and I need to put in an outlet to plug it into.  I am also dealing with a small gas leak.  I had a bigger leak, but it turned out that I needed to use pipe dope instead of tape on the connector hose, they need to seat all the way into tube.  I think the new little leak is at the test port, I tested the pressure 7.8 inches into the value and 4 inches going into the manifold.


Monday, October 3, 2022

Vent for the basement bathroom

It was long overdue, but I finally installed a vent for the basement bathroom. It was inspired by Nick taking showers down there. Getting into the basement took a lot more work than I anticipated.


It was more than my hole saw would handle, so I had to do it in pieces.  But eventually I made it through. I caulked the back of the vent and attached it to this perfect piece of vinyl that I found at Menards.


Then I just attached some duct to both ends and now the fan vents outside instead of into my basement.  I think I am going to get a timer for the fan so you can just press a button when you start showering and it will run for a half hour or so.  Otherwise I could see it getting left on, or turned off too soon.

Sunday, October 2, 2022

The other half of the patio, finally!

Finally got around to putting in the other half of the concrete patio off the basement doors.  I was putting it off because I wanted to replace the post and put in a standoff at the bottom.  However, the post is in perfect condition on this side and I figured I needed to get it done before the snow flies.  So I put the kids to work!

Maddie wanted to add a tablet under the concrete in case anyone every jackhammered it up!


It came out pretty well, there are a few more pebbles on top then I would like and I still haven't figured out how to get the hardener to show up and the release agent to go away.  But it matches the other side well.  I think I might seal the concrete now, I will have to see.

I wonder if there is something I can put around the hot tub to keep water away from the base.


Monday, September 26, 2022

Wiring up Ethernet for Nick

Nick has been after me for a while to run ethernet to his room, he is convinced it will be far superior to the wireless ethernet he is using now.  I haven't been in a big hurry, because I need to run a cable through the attic, and it is dusty up there.

However, Maddie started guitar lessons and that left Nick and me home for 2 hours and he wanted to do it, so we did.  He did most of the wiring in the panel and his room, I braved the attic though.

The amazing thing is that the wired connection is about 10x faster, when doing a speed test to our NAS.  The wireless speed is just as fast as the WAN connection about 100mbps, but with the wired connection it gets almost the full 1gbps that our network is capable of.

So, most of the time it won't make a difference, but when transferring files to the NAS it is a lot faster.  The location of the ethernet port in his room necessitated the purchase of a right angle ethernet cable, so we could push his dresser up against it.

Sunday, May 29, 2022

Yuck! Faucet has been leaking for awhile!

After working through the aforementioned issues in the previous posts we happened upon some water in the middle of the basement.  Jen then noticed that it was coming from the floor above at the kitchen sink.

Since there was a plethora for "stuff" in the cabinet we hadn't noticed a problem until this water in the basement, but when we removed everything we could see that we had quite the mess under the sink.  It appears that the faucet has been leaking for quite awhile, the bottom of the shelf was mushy and black.


So it was time to replace the faucet.  Unfortunatly, the nuts had rusted and were difficult to remove.  Basically I ended up breaking them.  It was not a fun task under the sink with a mucky floor.  Eventually got it off though.


Not sure what all this is, probably minerals from the water...  Not a good look in any case...

The old shut off values wouldn't turn anymore, so I cut them off and soldered on new one.  I have to make sure that the pipes are still properly positioned so that they drain in the winter.  These pipes will move up and down now.


Once the old faucet was off and the new turn off values installed the faucet installed easily and Nick did most of the work.  It is nice to be able to hand off projects to other people.  I am hoping that the new faucet will drain properly, so we might be getting a new one.  The guy at Menards said this is their busiest time of the year!


Saturday, May 28, 2022

New Life for the Water Heater

When we came up earlier this year we had to hot water, so we had to boil water on the stove to do dishes.  Not ideal!  I was thinking I was going to have to put in a new water heater, but I stopped by Appliance Depot and he recommended that I just check out the connections with a multimeter first.

Once I started doing a little reading I realized it might not be so bad.  The first thing I measured was the voltage at the heating element.  That is the bottom part with 2 wires going to it.  It measured 240V, so I knew the breaker was fine.

Then I shut off the breaker and did a continuity check, which resulted in no continuity.  I checked the bottom element as well and there was continuity there.  So I determined that the heating element needed to be replaced.


I could buy 1 heating element for $20 or a pack with 2 plus the thermostat for $25.  So I went with the later.


They normally have a 1.5 inch water heater heating element wrench that you can buy for $7, however they were out of them at the time.  So I went with $65 dollars worth of a socket and breaker bar.  I don't feel too bad about returning them after I used them, and I will pick up the $7 wrench when they are back in stock as it seems like something useful to have around with my spare heating element.
 

Here you can see the old heating element.  Not sure what happened to it, but it no longer has continuity.  Also interesting that it was a lot shorted then the new ones.  Same wattage though, which appears to be the important part.


Overall a simple fix and a big relief.  I wonder if I need to check the sacrificial rod in the water heater and if that could have caused the issue with the heating element.  I will have to read into that.

New Bunk Bed

We had ordered a bunkbed for the back bedroom at the cabin just about exactly a year ago and it finally came in.  I had hoped to use it in the winter when we don't open up the Eagle Nest.  But we didn't make it up this winter, so it wasn't a big lose.


Jen and Maddie worked on this project and did it almost entirely on their own.  I only helped with lifting the twin bed over the full bed.  They did a great job and it was comfortable to sleep on, and will provide for an extra bed in the future!


Toilet Trouble

We went up to the cabin for the second time this year so we had an idea of some of the issue we were looking forward to.  You can see the toilet fill mechanism cracked, so we had to manually control the shutoff value to fill the tank.


Fortunately, the fix was an $8 part from Menards.  It was a simple fix and Nick handled this one all by himself while I was working on other issues! 


Wednesday, March 2, 2022

New Minivan!

We put in an order for a new Toyota Sienna Woodland edition in October.  It came in January 15th.  When we went to pick it up the finance woman made a mistake and double countered our $1000 deposit.  So about a week after we picked it up, she calls and says she can just use our credit card on file to charge us the $1000.

I am a fair person, but I went back to our original purchase agreement and saw that we had originally had a $500 dollar credit, that was missing from the final purchase agreement.  I raised this issue and authorized her to charge $500 to use.  She eventually agreed after discussing it with the salesperson.  Not sure who had to eat the $500, but I thought it was fair.

Flash forward a month and a half.  On a trip to Colorado a rock flew up and cracked the windshield sufficient to require replacement (Jen had also gotten a little crack from a rock the day after we picked it up!).  Fortunately, it was covered by insurance and was pretty easy to get in and get fixed.

Then we ran over a nail somewhere which we discovered when the tire was reading low.  We took it it to Tires Plus, but they said it was not patchable and didn't have the exact match in tires.  We took it to Toyota the next day and they had 1 tire in stock and were able to put it on for us.  To the tune of $350.  Ouch.

Oh well, hopefully this isn't a sign of things to come, but at least so far they have all been fixable w/o too much hassle.

Tuesday, January 4, 2022

Garbage Disposals don't last forever :(

 Jen was doing some cleaning and went under the sink to grab something and found this!


The garbage disposal had been leaking into a bucket under the sink for who knows how long.  Fortunately, not too long because while the bucket was full, there wasn't a huge mess under the sink.  So after a little research it was determined that garbage disposals last 10-13 years, so right in window for the age of our house.

The easiest solution was to just buy a new one and put it in, rather then monkeying around with trying to fix the old one.  They run from $100 to more...


Here is the new one.  It is 3/4 hp instead of 1/2 hp like the old one.  It has a 10 year warrenty, which speaks to some confidence in the product.  Also, it is quiet, like really quiet.  Like is it doing anything.  Purchase price was $180 at Menards, I was hoping to fit it in the bag for 15% off, but they made the box too big.

I installed it in less then an hour, directions were clear and pretty easy to follow.  As far as crisis go, this one was pretty minor.