At this point we turned the value on the compressor to release the refrigerant into the line set and A-coil <DO NOT DO THIS>. I was outside and heard a loud hiss as I opened the value and some liquid drip out the bottom of the larger pipe in the line set. I immediately shut the value back down and the hissing slowed and eventually stopped. It was about 8pm at that point so we decided to wrap it up for the day, and call for some help in the morning.
The next day I called Wenzel heating and cooling and amazingly was able to get an appointment for the afternoon, I asked about cost and was told it will be a $99 fee for him to come out. In the afternoon the guy comes out and I explain what has happened, the first thing he asks is who sold me the system... He didn't think anyone would sell an R410A system to someone who didn't know exactly what they were doing.
The first thing he explained was that after attaching the line set you have to pull a vacuum on it to clear the humid air out of the system. He was worried that I had contaminated the compressor and he would have to pull a vacuum on that as well, but after I explained that I closed the value after I heard the hiss he thought we would be OK.
He heated up all the joints we had done with an acetylene touch to make sure the solder had flowed throughout the joint, and actually was impressed that we had been able to do what we did with what we had. Then he pulled a vacuum on the line set and A-coil while I threaded a 2 wire 18 gauge cable to connect from the furnace control board to the compressor. You connect to the C and Y points on the circuit board.


 The first matter is to cut a hole in the plenum of the furnace. We cut the hole above the burner, then attached some strips of right angle aluminum to rest the A-coil on. You can see the furnace coils are positioned right below the brackets that the A-coil rests on.
 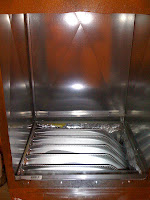 The A-coil is filled with a gas (nitrogen I think), to ensure that the integrity of the unit is intact when you install it. You use a tube cutter to remove the cap on the end of the bigger pipe coming out of the A-coil, and the gas is released at that point. You set the coil on the brackets and then work on "brazing" the line set to the A-coil.