 The first matter is to cut a hole in the plenum of the furnace. We cut the hole above the burner, then attached some strips of right angle aluminum to rest the A-coil on. You can see the furnace coils are positioned right below the brackets that the A-coil rests on.
 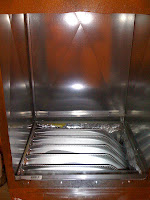 The A-coil is filled with a gas (nitrogen I think), to ensure that the integrity of the unit is intact when you install it. You use a tube cutter to remove the cap on the end of the bigger pipe coming out of the A-coil, and the gas is released at that point. You set the coil on the brackets and then work on "brazing" the line set to the A-coil.
Part III
No comments:
Post a Comment